Enjoy your favorite legacy games on the go with RetroArch
 1 Facebook Reddit
Using the RetroArch app for iPhone and iPad, Now you can play your favorite legacy games on the go — but it requires some work and setup. Here's how to do it.
RetroArch is an open source, ad-free, multi-platform interface for emulators and game engines. Originally created in 2010 as an emulator for the Nintendo SNES, over the years the app has grown to support many different platforms and legacy gaming systems.
The app supports games for many of the most popular gaming consoles of yesteryear, from the Atari 2600 to the original Sony Playstation and many more.
Which retro gaming systems RetroArch supports on iPhone, iPad and Apple TV
- Amstrad CPC
- Atari 2600
- Atari 5200
- Atari 7800
- Atari Lynx
- Bandai WonderSwan
- Commodore Amiga
- Commodore 64
- Commodore 128
- Commodore CBM-II
- Commodore PET
- Commodore Plus
- Commodore VIC-20
- ColecoVision
- GCE Vectrex
- Fairchild Channel F
- Mattel Intellivision
- Nintendo Entertainment System /Famicom (NES)
- Super Nintendo Entertainment System (SNES)
- Nintendo Virtual Boy
- Nintendo Boy Color Game
- Nintendo Game Boy Advance
- Nintendo DS
- SNK Neo Geo
- SNK Neo Geo CD
- SNK Neo Geo Pocket
- Sega Master System
- Sega Game Gear
- Sega Genesis/Mega Drive
- Sega CD
- Sega Saturn
- Sharp X68000
- Sony PlayStation 1
- Sony PlayStation Portable (PSP)
- Sinclair ZX Spectrum
- Texas Instruments TI-83
- Thomson MO/TO
- Watara Supervision
The App Store version of RetroArch can be installed on any iPhone or iPod Touch running iOS 14.2 or later, and is also available on iPadOS.
While the app is also available on Apple TV, this guide only covers the iOS and iPadOS versions of RetroArch.
According to the app's website and App Store page, RetroArch contains many advanced features, including multi-pass shaders, gameplay rewinding, AI translations, and more.
Although the app has been available on jailbroken versions of iOS for over a decade, we'll only focus on the App Store version because it's the easiest to install and available to everyone. for free.
RetroArch simulates gaming consoles on iPhone hardware using software emulation. Specifically, the application uses games and emulators compiled as dynamic libraries known as “libretro cores”.
This allows the application to run game ROMs. ROM, or read only memory, can be legally obtained from the original cartridge or game disc. In most cases, this is the only legal way to obtain the game ROM.
If you have a ready-made ROM, setting up RetroArch is quite simple, but there are a lot of options to choose from. Here's how to prepare everything.
How to add a game ROM in RetroArch
Once you have purchased the game ROM, you need to make sure that RetroArch can open it. If you have the game ROM in zip, rar or .7z format, you will need to extract it first.
RetroArch can use a variety of game ROMs.
You can extract .zip files using the built-in Apple Files app for iOS by tapping on the archived game. ROM. Other file types, such as 7z, will require the use of a third-party application such as iZip, which is available for free on the App Store.
A usable game ROM must have an obvious file extension, such as .n64 for the Nintendo 64 or .cue and .bin for the original PlayStation.
Once you have extracted the game ROM, you can open it and download the game through RetroArch. In the application you will find the option Download content.
Click the Download Content button. The option will allow you to select the desired ROM. In the app, you can browse the RetroArch home directory and your device's Downloads folder to find your game's ROM.
Also, you can click on the Open option, which will allow you to use the built-in iOS file browser to search for ROMs on your device.
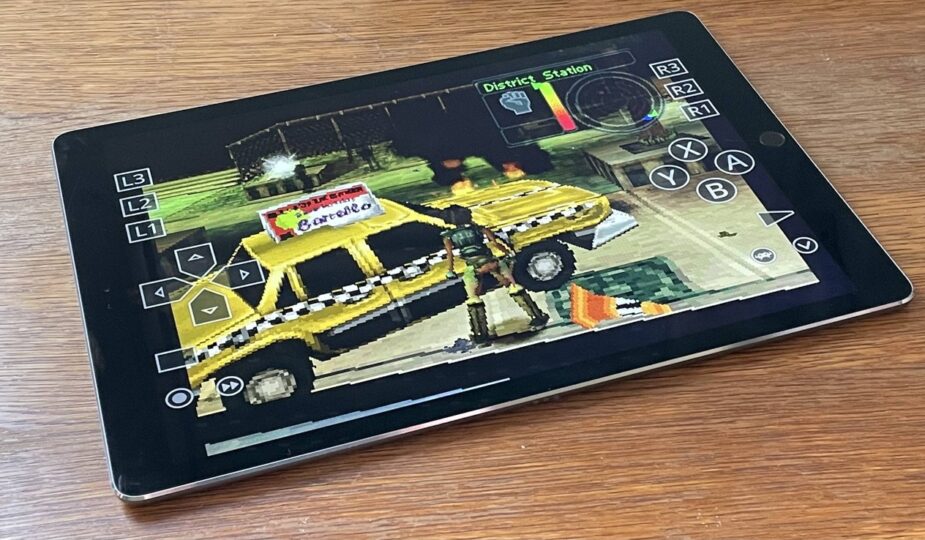
Once you have found the right ROM for the game, tap it to load the game, the desired game and the libretro core – this means you are ready to play using on-screen touch controls.
However, in some cases, RetroArch may prompt you to select the specific platform you want to emulate, or to select the exact libretro kernel you want to use for emulation. This is because the app supports multiple ways to emulate certain consoles, which may vary in performance.
Organize your games with RetroArch playlists
RetroArch gives you the ability to organize game ROMs on your console into so-called playlists. To create a playlist, you need to create a special folder for your ROMs, put all your game ROMs in there, and then scan the directory using RetroArch.
With RetroArch, you can organize your games into playlists
To create a new folder for your ROMs, you can use the default Apple Files app. Go to the main RetroArch directory by selecting the on my iPhone or on my iPad option in Files and tapping the RetroArch folder.
Clicking on the RetroArch folder again will take you to the main application directory. Here you can create a new folder that will contain all your game ROMs.
After that, open the RetroArch application and select the sandwich panel menu at the bottom of the screen. This will open the necessary playlist settings.
Clicking the import button will allow you to navigate to the previously created ROM folder and scan its contents.
After scanning the contents of the file in the ROM folder, use the arrow in the upper left corner of the screen to go back. You should now see a list of different game consoles. When you click on any of them, you will see your games for those consoles with miniatures.
Additional steps for PlayStation 1 emulation
Although RetroArch already has built-in support for most of the consoles it is capable of emulating, running games created for the original Sony PlayStation will require a little more effort.
PS1 games will require a PlayStation BIOS file
If you try to download a PlayStation 1 game, you'll likely see an error screen warning you that the firmware is missing. The missing firmware is the BIOS file for the original Sony PlayStation, which is not included with RetroArch and must instead be installed manually.
The first generation Sony PlayStation existed in several versions, created for different regional markets. This means that some games may require a BIOS file for a PlayStation sold in the US, while others may require a BIOS file for a PlayStation sold in Europe.
As we've said, AppleInsider is not Google, so we can't and won't provide you with the BIOS files themselves. But we can tell you how to use them with RetroArch.
Once you have the BIOS files needed for the games you want, you will need to place them in the RetroArch system directory under Files, i.e. Documents/RetroArch/RetroArch/system.
After this, you will be able to play PS1 games. However, keep in mind that performance may vary depending on the device you use to emulate the console and run the game.
What to do if your games are running too fast
If you just added your favorite PS1 game to RetroArch only to see sped-up animations with choppy audio, here's what to do. If you see this, it's because your device supports ProMotion, which is a variable refresh rate of up to 120Hz that Apple calls “ProMotion.” Most other displays usually have a fixed refresh rate of 60Hz.
Using in-app settings, you can fix game speedup
Luckily, there is a quick and easy solution to keep your game running at the specified speed.
In the app, tap the gear icon and open Video Settings, then Sync. When you scroll down the sync settings, you'll see an option to Sync to accurate content frame rates (G-Sync, Freesync).
Enabling this setting will force the game to load at the time required by the kernel, meaning it will no longer appear sped up.
How to change the RetroArch user interface
RetroArch allows you to customize the application's user interface to suit your personal preferences. You can choose from four preset design configurations. Each of the four design configurations has a completely different look and feel: the XMB configuration has a PlayStation-like user interface, while the RGUI has a more retro style with a blocky font reminiscent of the Minecraft font.
Customize the RetroArch user interface to your liking
RetroArch comes with the following UI layout options:
- GLUI (default)
- Ozone
- RGUI
- XMB
Many people prefer XMB to standard GLUI due to its similarity to the Sony PlayStation interface. The XMB design can also be found in pre-App Store versions of RetroArch as well as other platforms.
You can change the design configuration by clicking on the gear icon and scrolling down to Drivers. By clicking Drivers, you will see the option to select the desired driver menu, which will change the user interface of the application.
It's worth noting that the location of key settings may vary depending on the user interface you choose. For example, in XMB the option to change the user interface is underUser Interface > Menu.
Fast Forward Button and RetroArch Button
With RetroArch, you can easily speed up unskippable videos and beat those frustrating loading times by using the app's dedicated fast forward button. Once you've loaded the game, you can find the fast forward button in the bottom right corner of the screen.
Fast Forward and RetroArch buttons are circled
The fast forward option allows you to play games at double speed, allowing you to quickly move through levels or skip more or less anything.
The RetroArch button is also located on the right side of the screen. It's a small round button with the RetroArch logo inside. Using this button you can open the Quick Menu, which consolidates key game controls into one settings panel.
Using the Quick Menu, you can access save states, customize on-screen controls, activate shaders, rewind gameplay, and more.
Saving states in RetroArch
In addition to existing in-game save options, RetroArch includes support for save states, which can often be much more convenient.
Save states allow you to save your progress even if there are no save options in the game
Many older games lack checkpoint-based save systems, meaning , that if you fail halfway through a level, you'll have to start over from the beginning. RetroArch makes this inconvenience a thing of the past by using save states.
A save state is essentially a snapshot of your game at a specific point in time, a live record of your progress that you can always return to. RetroArch can remember exactly where you left off, what level you're at, what character you played as, and so on.
You can access saving states by clicking the RetroArch button, which opens the quick menu. From here you can save or load save states and manage the corresponding slots.
Customizing Onscreen Controls
RetroArch can simulate many older gaming systems, each using different controllers with unique button layouts. The controls of the GameBoy Advance are completely different from those of the Sony PlayStation or Atari 2600.
With RetroArch, you can choose from many different button configurations.
While RetroArch offers a set of universal on-screen touch controls, you can also revert to the button configuration originally designed for your game. This can be done relatively easily.
Click on the gear icon in the lower right corner of the screen and select User Interface. In the UI settings, click Screen Overlay, then Overlay Settings.
The file browser in the application will open, allowing you to select the desired location of the on-screen buttons. Clicking the arrow in the top left corner of the screen will allow you to navigate through the different built-in overlays and select the one that matches your game and console combination.
On-screen overlays can also be toggled through the RetroArch quick menu while your game is already running. Click the RetroArch button on the right side of the screen to open a quick menu that allows you to easily adjust your screen overlay settings.
What does Retroarch on iPhone and iPad mean for the future of game emulation?
For years, emulators were only accessible through jailbreak tweaks, unofficial modifications to the file system that have not been approved by Apple.
However, the company has recently become more lenient about game emulation software in its iOS App Store, and as a result, there are now quite a few emulators available for download.
With RetroArch you can emulate a wide variety of gaming consoles
Apps like Delta, Gamma, PPSSPP and RetroArch have only recently been approved, and this it's likely that we'll see more of them in the future.
As older gaming systems become more and more outdated every day, — and as iPhones become more powerful — Support for additional consoles in emulators is only a matter of time. Time will tell if and when this will happen.
One notable limitation in this area is the fact that JIT compilation, short for just-in-time compilation, is not currently allowed in iOS and iPadOS. This means that emulators for consoles like the Nintendo Gamecube will no longer be possible in the near future unless Apple changes its current policy.
While emulating “new” hardware will definitely be possible in the future, Apple will still have to evaluate and approve new emulators. Such apps will have to follow the company's and developer's App Store guidelines exactly or they won't be available.
RetroArch's popularity can only increase as a result of its debut on the App Store. The app is now available to a much wider range of users and could become a mainstream gaming app in the future.
Follow AppleInsider on Google News.