External Drives Are Significantly Cheaper Than Apple's Prices for Upgrading Storage
 14 Facebook x.com Reddit
You Can Easily Double the Cost of a New M4 Mac Mini by Buying Apple Storage — But if you know what you’re doing, you can buy external drives and save hundreds of dollars doing the same. Here’s how.
Apple’s new Mac mini is a terrific deal for its price and performance, but maybe only in the base configuration. Once you start adding things like extra storage, you run into Apple’s steep upgrade costs and the deal shrinks or even disappears entirely.
It’s true that Apple has improved things by increasing the amount of RAM the base model gets, as well as making 256GB the minimum amount of storage you can buy.
Not long ago, you could buy a Mac mini with 128GB of storage. You’ve probably guessed that 128GB is too small, but what you might not appreciate is that storage capacity is about more than just how many spreadsheets and videos you can store.
Once any drive gets below a certain amount — maybe even 10% of its capacity — you have bigger problems than not being able to fit one more email. A small drive that’s nearly full will slow your entire Mac down.
It can be unbearably slow. And there’s no way to upgrade the internal storage after you buy it.
Thunderbolt 5 logo and Thunderbolt 5 devices — Image credit: Intel, Hyper, Kensington, OWC
But of course, there is a way to get more storage, and you can do it for a fraction of Apple’s price. No other vendor sells SSDs for as much as Apple, and they generally don’t even come close to matching Apple’s prices.
There is a price to pay for a little complexity, though. It’s not very high, and the fact that you can use a lot more storage with a little effort is worth it.
You just need to know certain things and make certain decisions.
What You Need to Know About Using an External SSD on a Mac as a Boot Drive
- External Drives Can Be Slower
- Certain Files Will Always Be Saved to Your Boot Drive
- External Drives Need to Be Backed Up
It's always been thought that external drives are slower than internal drives, but that's no longer always the case. If you buy the Mac mini version of the M4 Pro, for example, you get three Thunderbolt 5 ports.
Thunderbolt and USB-C look the same, but they are very different. USB-C can transfer 20 Gbps, but Thunderbolt 5 can transfer up to 120 Gbps.
So, you need a Mac with Thunderbolt 5 ports and an external drive that supports it, as well as the right cable. You can buy an external SSD and add it to a Quick Connect enclosure, though note that there are currently no Thunderbolt 5 enclosures available.
Local Files and Backup
Most apps create temporary files when you run them, and good apps discreetly delete those files again when you finish working. However, whether they do this or not, they will save the files to your startup disk, which is usually your internal drive.
So it's best to plan for external drives from the start, rather than wait until something goes wrong.
But speaking of things going wrong, you should remember that your external drive may not be included in your backups. You need to set up Time Machine specifically to back up this external drive.
Backblaze's online backup service will automatically back up any drive that's permanently connected to your Mac, so you can't easily have a rotating bunch of drives that you use for different things.
Where You Install Apps
Unlike Windows apps, a Mac app used to be a single file that you installed wherever you wanted. Now, most apps also install and store a bunch of supporting files, and they do so on your startup drive.
Some of these are invisible, some are for temporary storage, but they can all be hard to find. However, Hazel Drive Utility will find them all when you uninstall an app.
Aside from these temporary files, few Mac apps require you to store them in your Applications folder. It's convenient for you to do this, but it's not necessary, since most applications will simply run on whatever drive they're on.
But most is far from the same as all. For example, Adobe's Creative Cloud suite requires you to install apps on your startup drive.
That's the exception. Most apps work just fine anywhere, even if they're installed on your startup drive by default.
This includes Apple apps, which are likely taking up the most space on your drive. Photos and Music, for example, may be taking up more space than you think.
Apple Intelligence might, too, if you choose to download its LLM to your drive. It's not recommended by Apple, not really supported, and not intended for everyday users — but it can be done.
If you download and save Apple Intelligence, you can theoretically move it to any drive. Just don't expect Apple to help.
While Apple does help with Mac media libraries like Music and Photos, as well as your Apple TV library.
You can move your entire Music library to a new external drive
And as of the latest macOS Sequoia betas, you can even do the same thing — or something very similar — with the Mac App Store. If you want, you can save any large app you download to the external drive and launch it from there.
You don't have much control. You can specify the external drive to save them to, but if the app is larger than 1GB, it will be saved to that drive.
If it's smaller, it will still be saved to your startup drive. There's nothing you can do to change which apps are saved where from the Mac App Store.
How to Install App Store Apps on an External SSD
- Open the Mac App Store
- From the App Store menu, choose Preferences
- If this option is present, check the Download and install large apps on a separate drive box.
- From the drop-down menu, select the external drive.
From now on, those large apps will install directly to the specified external drive – provided it is connected.
So this is Apple's nod to users with limited storage, but other manufacturers have done more. For example, Steam games can simply be saved to external drives.
How to Make Apple's Own Apps Save to an External Drive
- Open Music, Photos, or TV
- In the app's menu with the same name, select System Preferences
- Click the Files option
- From there, enter the new destination
Saving Your Own Documents to an External Drive
The Mac App Store and libraries from Music, Photos, or TV will automatically save to an external drive once you set it up. However, you'll have to remember to save your documents there every time.
However, you can use an app called Default Folder X. It can give you quick access to your folders, and it will also let you pin shortcuts to them in every Open or Save dialog box.
Among other things, Default Folder X lets you specify, for example, which drive all your Pages documents should be saved to
Plus, it can do what the name suggests and save the document to the default folder you once set up.
How to Boot from an External Drive
You can make an external drive a startup disk for your Mac. This is usually what you do when a problem occurs and you need to start your Mac from a separate startup disk.
It used to be very easy to create an external startup disk, and it still isn’t that hard. But Apple made it a multi-step process — and it was done for security reasons.
You can’t just start up your Mac from an external drive by pressing a key or changing the startup disk in System Preferences. Instead, you first need to disable a macOS security feature that stops you from booting from any external drive.
- Turn off your Mac
- Press and hold the power button
- Release it when you see one or more drives and the Options partition.
- Select Options and click Continue.
- When your Mac boots into Recovery Mode, choose a Mac user whose password you know.
- Log in as a user with administrator privileges.
- Ignore all the options in the pop-up list and instead select Startup Security Utility from the Utilities menu.
- Click to select your Mac's internal drive, then click Unlock.
- Follow the prompts regarding passwords and select Security Policy.
- In the Security Policy window that appears, click to select Weak Security
- Then click OK
- From the Startup Disk menu in the upper-left corner of the screen, select Shut Down
After all this, your Mac is ready – once you have prepared an external bootable working drive. You need to format the external drive and then install macOS Sequoia on it.
How to Format an External Drive on macOS Sequoia
- Connect an External Drive to Your Mac
- Open Disk Utility in Applications, Utilities on your Mac
- Carefully select your external drive from the list that appears
- Click Erase
- Give the drive a name
- From the drop-down menu that appears, select APFS
- Click Erase
- Search the Mac App Store for “macOS Sequoia”
- Click Browse, then click Get
- When you are redirected to System Preferences, click the Download button.
- Once downloaded, make a safe copy of the file named “Install macOS Sequoia”.
- Follow the prompts to install it to the drive you want.
- If your Mac starts asking you to set up Siri etc., just close it.
How to Get macOS Sequoia for an External Drive
Buying External Drives
This all assumes you have at least one external drive, but of course you might not. You can buy external drives from Apple, or you can save money and buy another Mac and still have money left over.
For example, Apple will upgrade the base 256GB Mac mini to 512GB for $200. To go to 1TB, you'll need to pay another $200, for a total of $400 more than the base price.
Apple's upgrade options vary by Mac, but for the new M4 Mac mini, the only other option is the 2TB upgrade. That costs $800.
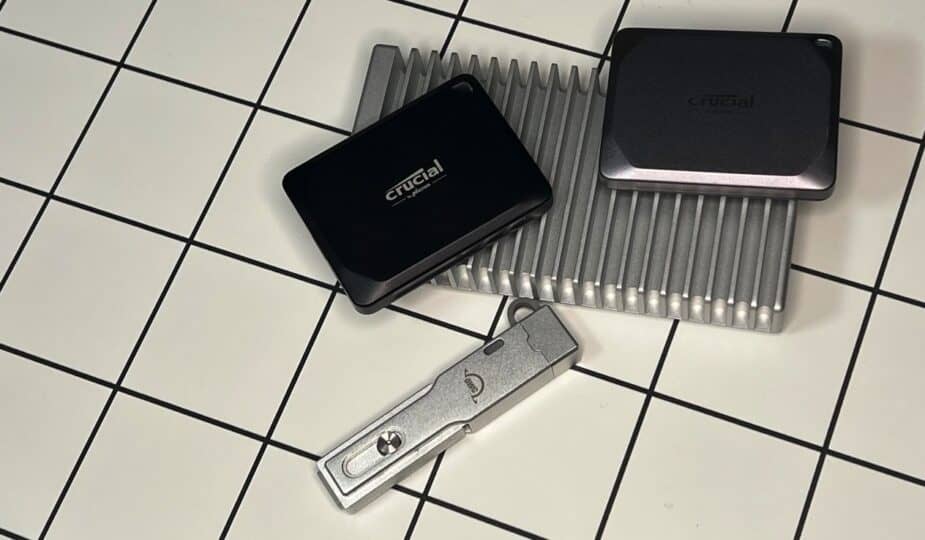
You shouldn't buy drives from Apple, and AppleInsider has a guide to the best external drives for Macs. But wherever you buy, the problem is that the drives either come in their own cases or are sold bare, ready to be plugged into other devices.
These bare drives come in cases that you buy separately.
A complete, standalone external drive basically has the advantage of being a one-stop purchase. You can also buy ones that come in a rugged case specifically for travel use.
So, for example, you can pay around $200 and get a SanDisk 2TB drive that simply plugs into your Mac. Or similarly, a SanDisk Professional 1TB PRO-G40 SSD, which is marketed as being super-rugged and typically costs around $175.
Or you can buy an enclosure that has a quick connection to your Mac and allows you to add a bare drive to it. So, an ACASIS 40Gbps M2. NVME SSD enclosure typically costs around $90, as does the UGREEN model.
OWC sells an enclosure that you can also buy pre-configured with up to an 8TB SSD.
Similarly, OWC sells an enclosure for $120. But in this case, you can buy it preconfigured with a 1TB drive for $250, or a configuration of up to 8TB for $1,400.
The SSD drives that fit in these enclosures are described as m.2-sized drives, which sounds like a stick of gum.
A 1TB m.2 drive typically costs $75. A 2TB m.2 drive typically costs around $130. In both cases, you can find them for less.
So the cost of the enclosure and drive is about the same as the cost of a single drive, though both options are significantly cheaper than Apple’s upgrade price. However, with an enclosure, you can swap out the drive for a larger capacity drive as needed — and it will use the same enclosure.
Or you can swap out the enclosure and keep the same drives. This can be an advantage as faster enclosures come out.
Until Thunderbolt 5 enclosures come out, the fastest option is a Thunderbolt 4 to USB4 connection. It delivers 40Gbps compared to USB-C’s typical 10Gbps.
USB-C without Thunderbolt can go up to 20Gbps, but that’s not very well supported on Macs. These connections will default to 10Gbps.
Buying Options
So you’ll need to think about the connection speed and whether you’re buying a full drive or a bare drive plus enclosure. That’s probably why full drives are more convenient, because there are so many options for different enclosures.
So many, in fact, that there’s an entire AppleInsider guide to choosing the right one.
Finding the right enclosure if you need one, or even just the right external drives, takes time. Apple may be counting on some people feeling it's not worth the trouble and they might as well just pay for more internal storage in their Macs.
But Apple is probably really counting on users not knowing they can use external drives like these.
Follow AppleInsider on Google News