 1 Facebook x.com Reddit
It's surprisingly easy to take a long web page on your iPhone or iPad with one screenshot and edit it so that it contains only the information you want You want.
When you take a screenshot on your iPhone — or an iPad for that matter — the initially created image looks like part of a web page that appears on your screen — literal “on-screen” image. However, articles on websites and home pages tend to be much longer and extend off the screen until you scroll down.
However, in reality, your iPhone “screenshot” also captures the entire website page, no matter how long it is. You then need to say that you want a full screen image, but when you do that, you can also easily edit the screenshot after it's taken to crop it to whatever section you actually need.
Taking a full-page screenshot on iPhone
To take a screenshot using your iPhone, briefly press the top volume button and the power button at the same time. The screen “flashes” to indicate that you have succeeded, and a small thumbnail of the visible screen contents will appear in the lower left corner, which will disappear off the screen after a few seconds unless you click on it — or if you move it to the left.
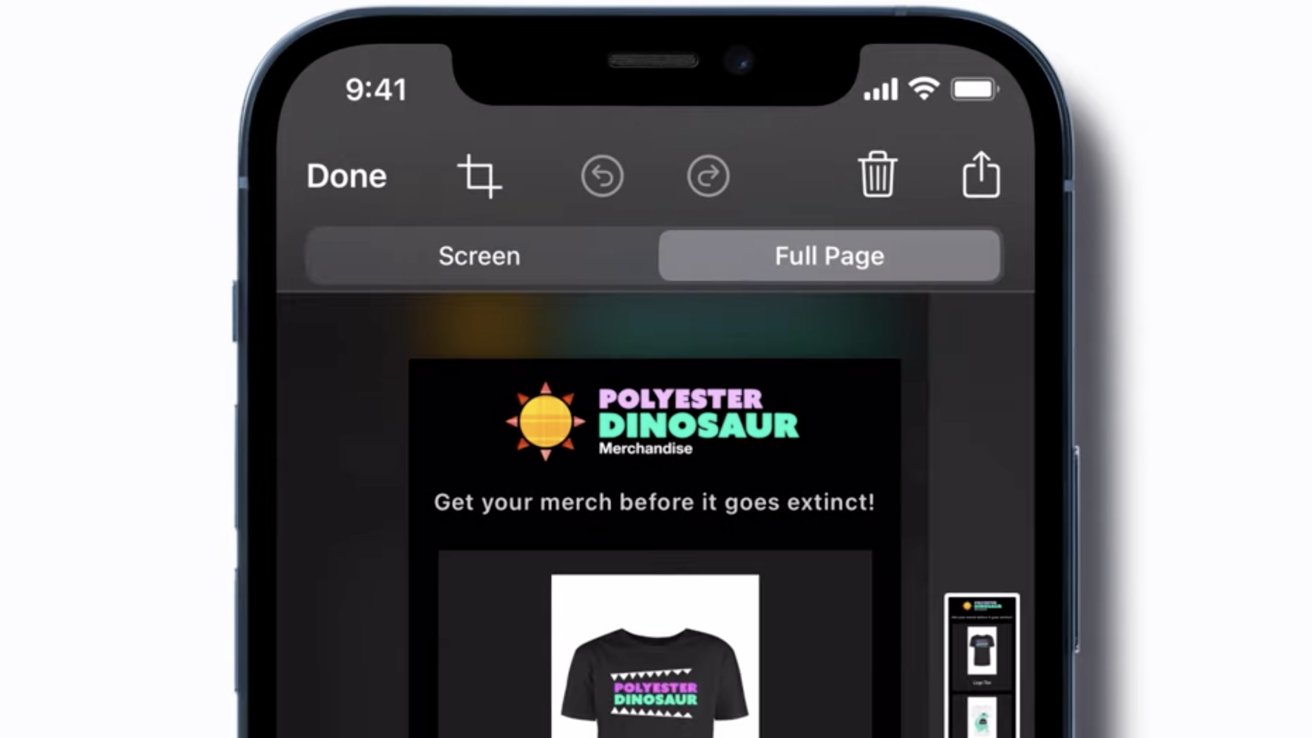
If you click on the thumbnail instead, it will expand into edit mode, starting at the top of the captured page. Above the image you'll see several standard editing tools and two options just below the tools: “screen” and “full page.”
If you intended to simply capture something in the visible area of the screen when you took the photo, you can click on the “crop” tool to trim off anything you don't need, click “Done.” button and choose where to save it. You can save it to the Photos app, Files app, or create a quick note with the image in it.
You also have the option to “copy and delete,” which means saving the screenshot image to the clipboard but deleting the screenshot itself, or deleting the screenshot entirely. The full page image options are slightly different: you can save to photo, save as PDF to files, or copy and delete and just delete.
However, if you want to capture the entire page, simply click on the “Full Page” option and you will see a long, thin and very small thumbnail of the entire image on the right, while your screenshot remains on the left. Likewise, all of these tools are available if you're working on an iPad.
Editing a full-page screenshot
You can scroll down a screenshot by dragging selected area of the thumbnail to understand what exactly you want to crop. Tools at the top of the screen will allow you to undo or redo edits, delete the image, or send it elsewhere.
If you want to save a full-page screenshot, simply click the Done button on the left side of the toolbar. You'll have the option to save it to Photos or save a PDF version in the Files app, where you'll be asked where in your iCloud Files you want to save it.
Similar to the Screenshot option, you can use the Send icon via email, message, AirDrop, and also send a screenshot of the entire page to specific people on your preferred social networking sites or add to posts. By default, screenshots and full-page screenshots are saved in PNG (Portable Network Graphics) format, which is a lossless RGB raster format.
As with many Apple features and apps, behind the “simple” operations that most users think of as all they need, there are hidden but advanced features you can take advantage of. For those times when you want to go beyond the basics, there are tools to create something more impressive — they just require a little more effort to find and use.